Multi Marx Mushroom Mac & Cheese–Delicious, Comforting and yes, good for you!

Once in a while an offer comes along that is too good to refuse. I have lots of foodie friends who keep me connected when there are contests and giveaways to enter, especially when there is free food involved. To that end, Marx Foods (http://marxfoods.com/) offered food bloggers 5 wonderful sample packs of their dried mushrooms if they agreed to participate in their Blogger Mushroom Recipe Challenge (http://marxfood.com/mushroom-recipe-challenge/).

You know me, never one to back down from a challenge so this is what I came up with, bearing in mind four things:

1. Lil and I have a crazy life lately–like that is something new, right?–and having something I can freeze part of to eat at a later date works for us

2. The weather is getting cooler at night and some comfort food was on my agenda to make anyway

3. I had lots of odds and ends of cheese in the fridge that needed to be used

4. I have sneaky ways of making comfort foods much healthier than the traditional version but still very very delicious! I love a good mac and cheese but adding the reconstituted dried mushrooms and a bit of the mushroom “broth” gave this classic a whole new dimension of deliciousness! And not one person can tell that I slipped in the high fiber pasta for the traditional

Multi Marx Mushroom Mac & Cheese

1/2 cup dried Marx Porcini Mushrooms

1/2 cup dried Marx Black Trumpet Mushrooms

2 cups low fat milk

3 tablespoons flour

1 1/2 pounds light or reduced fat cheese, cut in to small cubes or shredded–I had about four ounces Muenster, mozzarella, a bunch of sharp cheddar and American in the fridge so that’s what I used, all light or reduced fat versions except the Muenster

2 -one pound boxes pasta–I used one box of Pasta Plus (the pasta in the yellow box) and then I found a new type of pasta–it is in a green box and it is multi colored–orange/tan/green veggie pasta with a full serving of veggies in every serving and full of vitamins and fiber but you can use regular pasta too!

1- 6 oz package fresh sliced crimini mushrooms

1 tablespoon olive oil

Salt & pepper to taste

Place dried Marx mushrooms in separate small bowls or cups. Cover mushrooms with boiling water and set aside to reconstitute while you are getting everything else organized–they take about 20 minutes to soften and plump back up.

In a large pan, whisk together milk and flour. Bring to a low boil over medium heat, whisking occasionally–mixture will thicken slightly.

In a large pot cook pasta in well salted boiling water–drain when cooked to al dente and set aside–be sure to read package directions as the whole grain pasta cooks differently than traditional. When drained, pour pasta in to a large bowl and set aside.

Drain dried mushrooms through a fine sieve, reserving liquid. Pat dry, chop and set aside-these are the black trumpet mushrooms.

When milk and flour mixture is at a low boil, reduce heat to medium low and slowly stir in cheese, a little at a time until melted. Add more cheese and continue until sauce is thick and velvety. Whisk a few tablespoons of the mushroom liquid in to the cheese sauce to spread that rich mushroom flavor all throughout the dish. I froze the rest of the mushroom “broth” and can’t wait to use it the next time I make soup.

In the meantime, in another pan melt butter in a large saute pan and brown mushrooms over medium low heat. Season with salt and pepper to taste and set aside.

When all of the cheese is incorporated in to the sauce, pour over cooked pasta and mix well. Add all mushrooms and stir to combine. Season with salt and pepper to taste.

I divided this batch up into three casserole dishes, put crumbs on two, wrapped them well and froze them. At this point you can add seasoned and buttered cracker or bread crumbs over the top if you wish. We ate the rest very happily two dinners in a row without the crumbs–delicious!

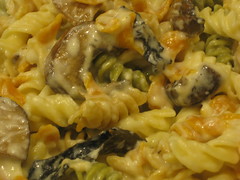
And there you have it–rich, delicious, earthy, comforting, nutritious, easy, cheesy and YUMMY!

Me? Bake A Yeast Bread?

I have always been one of those people who thought that baking a yeast bread was very difficult–yeast was some sort of mysterious creature and that terrible things would happen if I didn’t do everything just exactly right.

Well, that really isn’t true and the only way to figure that out is to just start making bread.  So I did.  Last Winter I made endless loaves of olive bread, lots of pizza crust (yes, that counts) and a few others and had fun in the process–and lots of nice bread to go with dinner and toasted for breakfast the next day.  There really is nothing better for dinner than a big salad, nice bread and a piece of grilled fish or some lobster and steamers in my opinion.

But as usual, I am getting off track.  Last week at the Topsfield Fair I entered the Fleishmann’s Yeast Bread contest.  When I say that the competition was fierce, I am not kidding.  There is so much talent there–some of these ladies have been baking bread their whole lives.  I knew that I probably wouldn’t have a chance if I chose something too complicated since I am still a novice but I was inspired by an idea I saw on the King Arthur Flour website for a twisted stuffed bread.  I also had to be realistic–I could not spend all day waiting for dough to rise, punching it for a second rise and then bake it—a girl has to work–so my friend Caroline Craig suggested that I tinker with her overnight dinner roll recipe so I did.  My final bread dough and filling recipe is completely different than the original that I found in the King Arthur email but I followed the procedure for making the figure 8 shape with good results.  So, gathered up my courage and just went for it–and I am so happy I did!

This recipe makes two loaves.  I submitted one to the Fair and made one for home that we enjoyed with soup and salad for dinner.  I added some finely chopped preserved lemon–preserved by yet another talented friend Beth–to the loaf I kept for myself and that little bit of salty citrus really added something to the mix.    Try it–feel free to use whatever filling ingredients you like–and let me know how you made out.  You don’t  have to do this one overnight.. You can do this early in the day and then bake it for dinner but I actually refrigerated it and baked it off in the morning before I went to work.  YUM!

Overnight Fennel & Cheese Brunch Twist

For the dough:

2 cups milk, warmed
1/2 cup plus one tablespoon olive oil, divided, plus additional for oiling the bowl
4 1/2 teaspoons Fleishmann’s Yeast
1/2 cup warm water
1/3 cup granulated sugar
4 large eggs
6 1/2 to 7 cups all purpose flour
2 teaspoons salt

For the filling:
2 teaspoons granulated garlic
1 1/2 teaspoon chopped fresh lemon thyme
1 1/2 teaspoons chopped fresh oregano
1 1/2 cups thinly sliced fennel
1/2 cup chopped Kalamata olives
3/4 cup drained oil packed sun dried tomatoes
3/4 cup freshly grated parmesan cheese
3/4 cup mozzarella cheese

In the bowl of a stand mixer fitted with the paddle attachment, combine warm milk, olive oil, Fleishmann’s Yeast, warm water and sugar. Beat once to combine and allow to rest until foamy.

Beat in the eggs and then slowly incorporate 6 cups of the flour on medium speed until dough forms, adding as much of the remaining one cup flour as necessary to form a cohesive dough. Switch to the dough hook and knead for about 5 minutes until dough is smooth.

Oil the mixing bowl and let dough rise overnight covered with plastic wrap.

In the meantime, saute sliced fennel with one tablespoon olive oil and season with salt and pepper to taste. Set aside.

When ready assemble twist, punch down dough and divide in half and roll out to about 8” x 22” on a well floured surface. Sprinkle on granulated garlic, half of the herbs, half of the fennel, olives, sun dried tomatoes and cheese. Roll the dough the long way to form a log, pinch the seam closed and place on a parchment covered baking sheet.

With kitchen scissors, lengthwise down the center of the log about 1” deep most of the way down the log, leaving about 1” on each end uncut. Twist one end to the right and one end to the left, tucking the ends underneath the log to form and “S” shape. Cover the bread with buttered plastic wrap or a damp towel and allow to rise again for an hour. In the meantime, repeat process with remaining dough and filling and preheat oven to 350 degrees F.

Bake twists, one at a time, in preheated oven for 35 to 40 minutes, tenting with foil after 20+ minutes to prevent over browning. Allow to cool before cutting and enjoy!

And how did I do in the competition you ask?  Well, even if you didn’t I am going to tell you–I came in third!  I was thrilled with the win and for me, placing in a bread competition is a huge step in the right direction when it comes to learning the art of bread baking.

And my friend Deb Stewart came in second with an amazing pizza—she is quite an accomplished cook and another one of my “Fair Weather Friends” who has enough ribbons to make a quilt, and perhaps wall paper her living room with them.  I was in very very good company.

So Far at the Fair…..with pictures & recipes!

I could not be more proud!  Not only has my girl Lil been on national TV (The Nate Berkus Show) and featured in a national magazine (Kiwi Magazine) but now she is bringing home the ribbons at the Topsfield Fair!

Over the weekend, Lil won two blue ribbons and one red second place ribbon for her desserts–and she is giving out her recipes.  Her third ribbon, a red second place, was for a version of her rice pudding that she made on the Nate Berkus show last week.  I am so proud of my girl!

Happy Apple Streusel Muffins–Recipe by Lily for the Topsfield Fair Muffin Contest

Streusel Topping
1/4 cup all-purpose flour
1/4 cup firmly packed brown sugar
1 teaspoon cinnamon
3 tablespoons cold butter

Muffins
2 cups all-purpose flour
1/2 cup sugar
1/4 cup firmly packed brown sugar
1 tablespoon baking powder
1/2 teaspoon cinnamon
1/2 teaspoon ground ginger
1/2 teaspoon salt
3/4 cup milk
1/2 cup melted butter
1 teaspoon vanilla
1 egg, beaten
1 1/2 cup diced apple
1/4 cup cinnamon chips

Heat the oven to 400°F with the oven rack in middle. Put cupcake papers in 12 standard muffin cups

First, make the streusel topping:

Combine the flour brown and cinnamon in a small bowl. Cut in the butter with a pastry blender until the mixture resembles coarse crumbs with some pea-sized pieces.

Combine the flour, sugar, brown sugar, baking powder, cinnamon, ginger, and salt in a large bowl.

Combine the milk, melted butter, vanilla, and egg in a medium bowl. Pour the milk mixture into the flour mixture, and stir only until the flour is moistened. Gently stir in apples and cinnamon chips.

Divide the batter into prepared muffin cups, filling them about 2/3 full. Sprinkle about 1 tablespoon of streusel over each muffin.

Bake 18 to 20 minutes or until golden brown and a toothpick inserted in the center of a couple of muffins comes out dry. Cool slightly.

Makes 12 -14 muffins

Three C’s Cookies–recipe by Lily for Topsfield Fair

2 cups all purpose flour
1 teaspoon kosher salt
3/4 teaspoon baking soda
1/2 cup butter flavored shortening
1/4 cup butter
1 1/2 cups light brown sugar
1 tablespoon vanilla extract
1 tablespoon milk
1 egg
1 cup semisweet chocolate chips
1/2 cup dried cranberries
1/2 cup cashews

Preheat oven to 350 degrees.  Put silicone baking mats on three cookies sheets.

In a medium bowl, sift together flour, kosher salt and baking soda.

In a large bowl, beat together shortening, butter, brown sugar, egg, vanilla and milk until light and fluffy.

Turn mixer to low speed and beat in dry ingredients.  When mixed, add chocolate chips, cranberries and cashews and mix until combined.

Using a medium ice cream scoop, dish out cookie dough on to prepared pan, 12 to a sheet.

Bake for 10-12 minutes until edges are lightly browned.  Makes 2 1/2 dozen cookies.

Salty Dog Day at the Essex Shipbuilding Museum by Lily

Hi!  My name is Lily and I want to tell you about Salty Dog Days at the Essex Shipbuilding Museum on Saturday.

I went to the event because my Nana was a judge in the Dog Costume Parade Contest and I thought it would be fun.  When we got there, there was a dog water rescue demonstration going on:

I didn’t take this picture quite fast enough but it is a dog in the water.

and this is Salty, another one of the water rescue dogs:

This is Parker–he is a Newfoundland–and was part of the water rescue program

I went up on to the land and saw a cute beagle named Daisy:

Then the parade started.  There were only two dogs dressed in costumes but there were lots of dogs in the parade without costumes.  The winner of the of the costume contest was Black Dog the Pirate:

and the beautiful twin golden retrievers Dylan and Gladys who won the prize as the prettiest pair of dogs in the parade:

and Monk the St. Bernard puppy won for the cutest puppy:

And here is a picture of people looking at Harold Burnham’s frame for his new boat.  I got to sign the frame

The Salty Dog Days was really fun and educational–and I took a tour of the shipyard too.  My great grandfather Wendell Lufkin worked in that shipyard a very very long time ago.

I hope you like my post–be sure to leave a comment if you do.  Lily

MUMS THE WORD in Essex–do you have your mums yet?

No,  not MY Mum, the fantastic Sue Lufkin, but chrysanthemums–and they are lovely,  just like my Mum!  Did Fall come too fast for you to get your mums yet?  One day it was Summer and then BAM–Fall!

Anyway, the Essex Merchant’s group is holding their annual “Mums The Word” campaign to not only bring added beauty to our lovely town with the addition of flowers everywhere but to raise a few dollars for the group as well.

Last night a hardy group of citizens braved the wind and showers to raise a glass to kick off the “Mums the Word” campaign and help with the pick up of some of the pre-order flowers–but there are lots and lots of lovely plants, just waiting for YOU!

So here’s the deal.  Stop by Joshua’s Corner–it is the shop with the gold trim up on the hill on the corner of 133 and Southern Ave (the road to Manchester) and purchase your mums during store hours, 10-5 daily and 12-5 on Sundays.  Mums are $3.95 for 1-20 8″ pots or $3.50 each for over 20 plants.

As you can see by my pictures, the plants are gorgeous and ready to go, full of blooms to provide color for your yard and neighborhood.  Pick up a few for a friend who needs a little cheering up and leave them secretly on their front steps.  Decorate the  little island at the end of your street or fill a neglected planter that passersby will notice when driving along the road.

Spread the Love, buy some Mums—–remember…..Mums the Word!

My visit to the Steve Connolly Seafood kitchens in Boston.

Let me tell you, I am one lucky girl.  I get to do fun things and cook with great people and chefs that not everyone gets to do–and believe me, I appreciate the opportunities!

A little while back, I got the chance to tour the Steve Connolly Seafood facility in Boston–what an impressive operation–and even better than that the chefs cooked three delicious recipes that they shared with me to give to you right now.  The show with these recipes will air again this Friday at 4:30 and then again Sunday at 11:30 am on Cape Ann TV and then next week, another show with a new recipe and more of our tour.

These recipes are easy to make at home using readily available ingredients and fairly simple techniques. Trust me– you want to make these recipes and they will be a HUGE hit with your friends and family!  I took lots of photos on our visit so that you can see how the finished dishes should look.

Please let me know if you make these recipes and how they came out–and as always, if you have any questions, please don’t hesitate to ask.

And a HUGE thank you to Chef Michael and Chef Carlos for interrupting their busy schedules and sharing their delicious recipes with all of us and to David Coombs and his staff for showing us around–thanks a million to all of you!

ASIAN LOBSTER AND MELON SALAD

Lobster Meat, fresh

Diced ¾ inch……………………….1 cup

Honeydew Melon, ripe

Diced ¾ inch……………………….1/2 cup

Cantaloupe, ripe

Diced ¾ inch…………………..…..1/2 cup

Mango, ripe

Diced ¾ inch…………………..…..1/2 cup

Ginger , minced………………..………1 tsp

Orange zest, fine julienne………..……… 1 TBSP

Cilantro leaves…………………..……..1 TBSP

Mache or Baby  Spinach…………….3 oz.

Dressing:

Orange Juice…………………………1 oz.

Rice wine vinegar…………………..1 TBSP.

Canola or Peanut oil……………….1/2 cup

Sriracha sauce………………………..1/2 tsp.

Sea salt and black pepper…………to taste

For dressing:

Place orange juice, vinegar, Sriracha sauce, salt and pepper in a stainless steel bowl. With a wisk, blend in the oil until emulsified.

For the salad:

Toss the Mache or Spinach leaves with a little dressing and place on a platter. Put Lobster, Fruit, Ginger, Orange zest, and Cilantro in a stainless steel bowl. Add rest of the dressing, and toss  until coated. Put the Lobster Salad over the Greens, and garnish with edible flowers.   Serves 2

And here is another gorgeous and easy recipe–you can use halibut as Chef Carlos did or he said you can use any other firm fleshed white fish–just watch the cooking time if it is on the thinner side.

Nova Scotia Halibut with Roasted Corn and Tomato Salsa

2 Halibut portions skls/bnls…………………….2  each,  9 oz.

Olive oil………………………………………………….2 TBSP

For Chive sauce:

Unsalted Butter…………….….4 TBSP

Shallots, minced……………….2 TBSP

White Wine, dry…..……….….2 TBSP

Chives, chopped……………….2 TBSP

Sea salt and Black Pepper….to taste

Salsa

Corn, shucked …………………………….…….2 ears

Olive Oil……………………………………………2 tsp

Plum Tomatoes, peeled & seeded………..2

Chives, chopped……………………………..…2 TBSP

Sea salt and Black pepper…………………..to taste

For the Salsa:

Slice off the corn from the cobs and break up the kernels.

Dice tomato into  ½ inch pieces and put in stainless steel bowl with chives.

Heat olive oil in a non-stick pan until hot, and add corn, tossing and pan

roast until lightly caramelized, and add to bowl with tomatoes.

Season with salt and pepper and mix together. Reserve.

Wipe pan clean for next step.

For the Halibut: Preheat oven to 450 degrees F.

Season Halibut with salt and pepper. Add oil to pan until hot and place Halibut in pan flesh side down and pan sear until nicely browned. With a non stick spatula, turn Halibut over gently onto skin side, cover fish with foil, place pan in oven, turning temperature down to 350 degrees and cook 10 minutes until just done. Do not overcook.Remove fish to warm plate and cover with foil. Return pan to stovetop, add 2 TBSP butter and shallots and sauté until transparent. Add wine and reduce by half, add remaining butter, and swirl in the pan. Add chives at end, correct seasoning and set pan aside off the burner.

Plating:

Place large spoonful of Corn Salsa to one side of plate. Place Halibut on plate leaning on the salsa, spoon butter sauce over the fish, and garnish with fresh chives. Serves 2

Another Saucy Mama party pizza recipe and a giveaway–and I know that everyone likes a giveaway!

Here’s the second recipe using some terrific products from Barhyte “Saucy Mama.”   I created this recipe as part of a food blogger recipe contest.  I needed to make a recipe that was a crowd pleaser, easy to make and delicious and I hope this pizza fills that bill.

If you would like to try some “Saucy Mama” products be sure to leave a comment at the end of this post or at the end of my previous pizza post:

http://laurielufkin.wordpress.com/2010/09/15/heres-a-fun-new-party-pizza-recipe-and-a-giveaway-and-i-know-everyone-likes-a-giveaway/

and here’s today’s yummy and spicy recipe~

Spicy Chipotle Shrimp Party Pizza

1 1/4 cups Saucy Mama Lime Chipotle Marinade, divided
10-12 large shrimp, peeled and deveined
4 oz softened cream cheese
1-1 pound homemade or store bought pizza dough
Cornmeal for dusting peel
1/2 red pepper, thinly sliced
1/2 yellow pepper, thinly sliced
2 scallions thinly sliced, white and light green part only
2 cups mozzarella cheese
1/2 fresh avocado, sliced
3 tablespoons fresh cilantro, roughly chopped
Salt & pepper to taste

Preheat oven to 475 degrees F.  Move oven rack to the bottom third of the oven and place a pizza stone or overturned large baking sheet on the rack.

Combine 1 cup Saucy Mama Lime Chipotle Marinade and shrimp in a small bowl and set aside.

In small bowl, mix together remaining 1/4 cup Saucy Mama Lime Chipotle Marinade and cream cheese and stir until smooth (add a few more tablespoon marinade if you like your pizza extra spicy)

Stretch the dough on a pizza peel or the back side of a baking sheet that has been well dusted with cornmeal.  Spread cream cheese mixture on the dough, leaving 1” dough uncovered to form the crust.  Layer on sliced pepper and chopped scallions and one cup of the cheese.  Slide pizza into the oven on the hot stone and bake for 10 minutes.

After 10 minutes, add marinated shrimp the pizza, gently tapping off any excess marinade before placing the shrimp on the partially cooked pizza.  Sprinkle on remaining cheese and continue to bake for an additional 8 to 10 minutes until crust is golden brown and shrimp is cooked through.

When cooked, remove pizza from oven and allow to rest for 5 minutes.  Add sliced avocado and sprinkle on chopped cilantro.  Season with salt and pepper to taste and slice into wedges or squares to feed your guests.

Enjoy!

Here’s a fun new party pizza recipe

Last night I was given the task of coming up with a recipe for a product that was sent to me in the mail.  This is a fairly new company and they asked me to try their product and come up with an easy recipe that would be perfect to share at a party–and what says party like pizza?

You can buy the Saucy Mama products on line at this site:

http://www.barhyte.com/

but in a pinch you could use the sweet vidalia onion salad dressings that I have seen locally in the grocery stores.  This is just one of the products that they sent me–they have a HUGE selection of excellent marinades, mustard, gourmet olives and more on their site.  If you would like to win a couple of products, just leave a comment here after my post and I will randomly choose a winner and mail (or drop off,  depending where you live) a selection for you to try.

So, here is the recipe I created using their Saucy Mama Sweet Onion Marinade:

Cheese Lover’s Saucy Mama Chicken Party Pizza

2 boneless skinless chicken breasts, sliced in to bite sized pieces
1-12 oz bottle Saucy Mama Sweet Onion Marinade
4 oz cream cheese, softened
1 1/2 teaspoons dried thyme
1 tablespoon olive oil
2 cups thinly sliced leeks
3 cloves garlic, minced
1-homemade or prepared one pound ball pizza dough
3-4 small sliced canned or leftover cooked potatoes
1-small onion, sliced in to rings
1 cup shredded mozzarella cheese
1 cup shredded fontina, mild cheddar or jack cheese
1/4 cup shredded parmesan cheese
2-3 tablespoons freshly chopped chives
Salt & Pepper to taste

Preheat oven to 475 degrees.  Move oven rack to the bottom third of the oven and insert a pizza stone or overturned large baking sheet.

In a small bowl, combined sliced chicken and 1cup Saucy Mama Sweet Onion Marinade and set aside.  In another small bowl, combine 1/2 cup Saucy Mama Sweet Onion Marinade, dried thyme and cream cheese.  Mix together until smooth and season with salt and pepper to taste and set aside.

In a large skillet over medium heat add olive oil, garlic and leeks and aaute until leeks are tender and translucent, about 10 minutes, stirring occasionally.

In the meantime, stretch pizza dough on a pizza peel or back side of another large baking sheet that has been floured or sprinkled with cornmeal.  Spread Saucy Mama Sweet Onion Marinade and cream cheese mixture on to dough to  cover, leaving  1” uncovered to form the outer crust.  Top mixture with cooked leeks and top leaks with a single layer of sliced potatoes. Add the onions in a single layer.

Sprinkle on mozzarella cheese.  Drain chicken from Sweet Onion Marinade and place on pizza in a single layer.  Top chicken with shredded fontina and season with salt and pepper.

Slide pizza on to preheated pizza stone or baking sheet and bake for 15-20 minutes until crust is golden brown and chicken is cooked through.  Remove from oven and  sprinkle on grated parmesan and chopped chives.  Allow to rest 5 minutes before slicing in to small squares or slices to feed  your guests.   Enjoy!

Hearty and Healthy Back to School Soup Recipe and a few Celebrate Gloucester photos with Lily

Happy Back to school everyone!  What a terrific summer it has been–and hurricane Earl?  What hurricane?  Anyway…….

I have a contest entry in the Le Creuset True Memories contest and need your support–the link to the entry is below.  I noticed how cool it is the evening and started thinking that a nice pot of soup might just the thing to have in the fridge for quick suppers this week so here’s the recipe for the soup I referred to in the entry–If you would be so kind as to go and vote for my entry that would be most helpful to me:

http://www.brickfish.com/Pages/PhotosAlbums/PhotoView.aspx?qsi=48828100

Hearty Southwestern Fire Roasted Tomato Soup
3 tablespoons olive oil, divided
2 medium onions, diced
1 large green pepper, diced
1 large red bell pepper, diced
4 teaspoon ground cumin, divided
2 teaspoon chili powder, divided
8 cups chicken broth
3 tablespoons jarred or homemade roasted garlic
3-14.5 oz cans Diced Tomatoes
2-14.5 oz cans Fire Roasted Diced Tomatoes
1-14.5 oz can Diced Tomatoes with Green Chilies

1-14.5 oz box whole wheat or high fiber white pasta

1/2 cup fresh cilantro, roughly chopped
Salt & pepper to taste plus additional salt for pasta water
Reduced fat sour cream (optional)
Fresh cilantro sprigs (optional)

*if pasta is not on hand, add one or two cans of rinsed black beans and some canned corn–delicious!  Grilled diced shrimp or chicken breast would also make a nice addition to the recipe

On the stove top in a large Le Creuset Dutch oven (or other heavy bottomed pot), combine onions and 1 tablespoon olive oil. Cook slowly over medium low heat, stirring occasionally, until onions are translucent and beginning to caramelize, about 15 minutes. Add roasted garlic, red and green peppers and 2 teaspoons cumin and cook until peppers are softened, about 10 more minutes, stirring occasionally.

With an immersion or conventional blender, puree cooked vegetable mixture until smooth. Return puree to the pan and add chicken broth, Diced Tomatoes, Fire Roasted Diced Tomatoes and Diced Tomatoes with Green Chilies and stir to combine. Simmer over low heat for 30 minutes.

While soup is simmering, sprinkle remaining cumin and chili powder over chicken breasts and season with salt and pepper. Saute chicken with one tablespoon olive oil until cooked through, about 10 minutes, depending on thickness of breasts. Remove from pan and set aside. Allow chicken to rest for 5 minutes and cut into cubes.

Meanwhile, in another large pot filled with salted boiling water, cook entire box of pasta according to package instructions. Drain and toss with remaining 1 tablespoon olive oil and set aside.

After soup is simmered, add diced chicken, pasta and fresh cilantro. Reheat if necessary and season with salt and pepper to taste. Top individual servings with one tablespoon sour cream and fresh cilantro springs, if desired.

And now, some great photos of Lily with the celebs from Sunday’s Celebrate Gloucester Concert:

Lily and Ed Collard

Lily and Alan Estes

Lil with Henri Smith and his amazing trumpet player (sorry, I don’t have his name)

And Lily with Charles Neville

What a great event and Lil and I were so happy to help out and volunteer–count us in for next year!

Yep, I’m still alive and doing lots of fun cooking stuff…….

And it rained and it rained….for the Beringer Wines Great Steak Challenge in Newport, RI on Sunday, August 19th. But we didn’t let a little rain dampen our fun or competitive spirit–it was great! The cook off was held during the Newport Wine Festival down town and it was so much fun–those Beringer Wine people know how to throw a great cook off, even in the rain.

The event began with a lovely waterside “meet & greet” the night before at the hotel that they arranged for us with copious amounts of wine and lovely snacks. As it was a regional cook off (the winner goes to Napa to compete against the other regional winners) so it was fun to meet other cooking friends from New England, one who lives as close as Sturbridge.

Anyway, the day of the cook off, it rained, and it rained and then it rained some more but when it’s go time, you have to go, rain or shine. There is a law in RI that grills cannot be under any covering such as a tent or awning so we were grilling in the rain whether we liked it or not. There were 10 contestants divided in to two heats and I was grilling in the second heat. Bless my first heat friends–they grilled in the pouring rain. However, the true spirit of sportsmanship was displayed with my friend and fellow competitor Lisa held the umbrella for my other new friend Veronica while she grilled:

Here I am, observing my competition before my heat:

And then it is my turn to cook. Thankfully, the rain had let up a little. I got my ingredients ready to go and then it was time to cook!

The steak is seasoned and on the grill with beautiful sliced tomatoes that had been brushed with olive oil and seasoned with salt and pepper:

and then I put the ingredients together to build a panini and used the panini press to grill it on both sides:

While the sandwich was grilling, I made a nice garnish from rosemary, fresh tomatoes and olives and voila, a Grilled Mediterranean Steak Panini–YUM!

So the judges loved my sandwich–I scored 5 out of 5 for my food but unfortunately, my wine pairing was a little off. I paired the sandwich with Beringer Merlot and only got 3 out of 5 points for the pairing. I am very very proud of my efforts and came in third–not too shabby for a girl who usually cooks seafood! And congratulations to my friend Lisa Keys from CT that came in first and will be traveling to Napa in a few weeks to represent New England and compete for $15,000 in the finals!

Chocolate…and more chocolate

Today seems like a good day for a nice cookie recipe.  These are a prize winning recipe of mine entered at the Topsfield Fair and they are easy to make and delicious!  Use the best chocolate you can find but don’t go out of your way–what they sell at the grocery store will make a wonderful cookie.  You might even have the ingredients in your cabinet already so if you make them, let me know what you think.

Speaking of the Fair, the exhibitor’s handbook is available on line and the cooking contests are all lined up and here’s the link to the pdf of the contest–come on down and join the fun–you might walk away with a ribbon and bragging rights!

http://www.topsfieldfair.org/handbook/2010/FoodsDept.pdf

Triple Darks

2 cups all purpose flour
1 cup natural cocoa powder
1 teaspoon baking soda
1 tablespoon espresso powder
½ teaspoon kosher salt
8 oz 60% cacao chocolate, broken into pieces (you can use chips, Ghirardelli and other make these)
1 cup salted butter
3 cups granulated sugar
4 large eggs at room temperature
1 tablespoon vanilla extract
8 oz semisweet chocolate, chopped

Preheat oven to 350 degrees.  Line 4 large baking sheets with parchment and set aside.

In a medium bowl, whisk together flour, cocoa powder, baking soda, espresso powder and salt and set aside.

In a microwave safe dish, melt butter and 60% cacao chocolate.  Stir until smooth and allow to cool slightly.

In the bowl of a stand mixer or with a hand mixer in a large bowl, combine sugar, eggs and vanilla until well blended and lighter in color.  Gradually mix in flour mixture and then chocolate mixture and finally chopped semisweet chocolate.

Using a  scoop onto prepared baking sheets, 9 to a sheet.  Bake 15-17 minutes in preheated oven until cookies are flat and surfaces are cracked.  Enjoy!

Chocolate Zucchini Muffins…..WHAT??

You should see the reactions I get……”Yum! These are great muffins! So moist, so delicious….but what are those little green specs? ”

And when I tell them it is zucchini they really don’t know what to say.  It’s either “can I have the recipe?” or “I don’t like zucchini but I like these!”   My Mom’s friend Butch loved these muffins last time I made them but made  a point of telling me that next time I made them to be sure NOT to tell him there was zucchini in them and “ruin” it for him–but to be sure to bring some by.

Make no mistake–these are not “health food” muffins–they have their share of sugar, chocolate and white flour but if you are looking for a treat with a full four cups of zucchini in them this is the way to go.  I was thinking some walnuts would be delicious too but I have a lot of “no nuts” people in my life so I went with extra chocolate bits.

Chocolate Zucchini Muffins

2 cups all purpose flour

1 cup cocoa powder

1 teaspoon salt

2 teaspoon baking powder

3 tablespoons granulated sugar

1 1/2 cups light brown sugar

1/2 cup melted butter

1/2 cup canola or vegetable oil

3 large eggs, at room temperature

1 tablespoon vanilla extract

4 cups grated zucchini

1/2 cup milk

1 1/2 cups chocolate chips

Preheat oven to 350 degrees.  Line 24 muffins tin cups with paper liners and set aside.

In a medium bowl, whisk together flour, cocoa, salt and baking soda and set aside.

In a large bowl, beat together granulated sugar, brown sugar, melted butter and canola oil until well mixed.  Add eggs, one at a time until combined.  Stir in vanilla and grated zucchini and mix well.

Mixing by hand, add the flour mixture and milk alternately in two batches and stir until nearly combined with a few flour streaks visible.  Add all but 1/4 cup of the chocolate chips and finish stirring until just combined.

Scoop in to prepared cups (I used a large ice cream scoop) and fill cups almost to the top.  Sprinkle a few of the remaining chocolate chips on top of the batter.

Bake for 18-24 minutes until just cooked through, rotating the baking pans half way through the cooking time if your oven heats unevenly like mine does.   Insert a toothpick into the center of one of the middle muffins and if it comes out nearly clean they are done.  Do not over bake.

Allow to cool completely in the pan.   The strange white looking things in my muffins are store brand chocolate chips that turned light in color when I baked them–I will NOT be buying those again.

If you want to call these cupcakes, make a nice chocolate buttercream and frost them or just pipe a large swirl of icing right on the top.  Makes 24 muffins.

As always, if you have any questions please feel free to ask and if you make this recipe let me know what you think.  Thanks!

Saco River Boys Seafood Chowder from Clark Dexter and some crackers to go with it.

It was one of those rare cool days a few weeks ago (believe me, I am not complaining) that I was lucky enough to go back in to the kitchen of Chef Clark Dexter while he whipped up another one of his specialties “Saco River Boys Seafood Chowder.”  Clark and a large group of his friends make a yearly “man’s trip” to the Saco River for a canoe trip (no girls allowed) and Clark is in charge of all things culinary–clearly, he has smart friends for putting him in charge–and we are all fortunate that he is sharing this wonderful recipe with us.

I have had a lot of seafood chowder in my life and much like Gail “The Chowder Lady” Mathews’ clam chowder, it is one of the best chowders I have ever tasted.  Rich and decadent and full of lobster, shrimp and whole steamers I was in heaven.  We topped it off my my own recipe of homemade oyster crackers and it was a meal fit for royalty, or a large group of men in canoes, or both.

So, without further delay, here are both recipes–and thank you again Clark for welcoming me back in to your kitchen!

SACO RIVER BOYS SEAFOOD CHOWDER

Ingredients:

1 1/2 lb. Small Soft Shell Clams (Steamers) (soak in cold water for ½ hr.)
1 ½ cups water
3/4 lb. 16-20 Shrimp (shelled and cut in half)
3/4 lb Sea Scallops (cut med. To small)
3/4 lb Fresh Lobster Meat (cut med. To small)
½ cup Salt Pork (diced small)
½ Stick of Butter
1 Med. Onion (sliced)
2 Med Potatoes (cubed and cooked until soft then cooled in cold water, drained and set aside)
1 cups of flour
16 Oz. Of Clam Juice
24 Oz.  Milk
12Oz.  Light Cream
White Pepper

(1) Put salt pork in a pan on med. To low heat and render until salt pork is nice and brown. Strain pork scraps from liquid and set aside pork scraps. Add butter and onions to salt pork liquid and cook until onions are  soft. Add flour to this to make your roux (roux is equal parts of fat and flour cooked). Cook this while stirring for about three min. to set the roux.

(2) Put clams in a pan with water and cooked covered until clams open. Remove clams from the liquid and shell and clean. Add 16 oz. Of clam juice to this liquid, add shrimp and scallops and cook until just firm. Remove shrimp and scallops and set aside. Bring this liquid to a boil and add roux, Whip for about two min. this makes your base.

(3) Stir in milk and cream while cooking on low heat. Add potatoes, clams, lobster meat, shrimp and scallops, heat until nice and warm. Chop half of the pork scraps that you had set aside (very small) and add with a little white pepper.

(4) Serve with Laurie Lufkin’s home made oyster crackers. ENJOY

Homemade Oyster Crackers

2 ÂĽ teaspoons yeast
½ cup lukewarm water
½ teaspoon sugar
1 2/3 cup cake flour
1 ½ cup all purpose flour, plus more for rolling surface
1 teaspoon salt, plus more for sprinkling if desired
ÂĽ cup cold shortening, cut in to cubes
ÂĽ cup cold butter, cut in to cubes
2 tablespoons milk

Preheat oven to 375 degrees.  Cover two baking sheets with parchment paper. Set aside.

In a small bowl, combine yeast, water and sugar.  Stir to combine and set aside until mixture is frothy and yeast is activated.

In the bowl of a food processor, combine cake flour, all purpose flour and salt.  Process for one minute to mix and aerate.  Add shortening and butter and pulse until small crumbs form.  With processor running, pour yeast mixture through feed tube.  Process until a soft dough forms.

Turn dough out onto a floured surface and knead in a little addition flour if dough is sticky.  Roll out the dough as thin as possible into a rectangle.  Fold in the long sides of the dough to the center and repeat with the ends to form a smaller rectangle.  Roll out thin again and repeat this procedure two more times.  Roll out one final time to a 9” x 11” rectangle. Brush top of dough very lightly with milk and sprinkle very lightly with additional salt if desired.  With a pastry cutter or knife, cut crackers in to ½” – 1” squares as desired.  Place crackers 1” apart on prepared baking sheets.  Bake for 12-15 minutes until lightly browned.  Slide parchment off of baking sheet and allow to cool.  Serve with seafood chowder.  These can be made days ahead if necessary as they keep well stored at room temperature in an airtight container.

And the Grand Prize Winner is…….Lily!

I must say I am about as proud as a Mom could be.  A while back, Lily and I entered her recipe and video in to Kiwi Magazine’s “Next Great Young Chef” contest and we just got the ok to disclose the results–she is the Grand Prize Winner!

Her recipe is called “Monkey Business Chocolate Rice Pudding” and is excellent.

Here is the winning video:

Check out the video and let us know what you think.

The prize is a nice hefty check and a feature in the October 2010 issue of Kiwi Magazine.  Kiwi is a kids/parenting magazine full of helpful tips, articles and recipes and Lily can hardly wait for the photo session and interview.

I think Lily has a future in cooking on TV!

The most simple indoor or outdoor Cod dish recipe….and sides to go with it…

How about a lovely recipe for cod?  That gorgeous fish caught right off Gloucester?   This is a good one because it will work with pretty much any firm fleshed white fish–have done it with striper also.

The day we shot this episode of Inspired Cooking, All About Cod, it was about 100 degrees (no exaggeration) and humid.  So we got all set up to film outside and grill the fish and veggies on my grill but something was awry.  I couldn’t get the grill to work.  I tried, my camera guy tried, but not being one to mess with propane (and realizing the AC was on the house and it would be much cooler) we took the show inside and got set up.  So, the long and the short of this story is that you can do this recipe both outside or inside if you have a grill pan.  I have a cast iron grill pan that I love and grills/sears fish perfectly–if you don’t have one, consider picking one up–they are terrific!

Grilled Cod with a parsley lemon crust:

2-3 cups panko bread crumbs

1 lemon, zested and juiced

3-4 tablespoons finely chopped fresh parsley

2-3 tablespoons olive oil, plus more for brushing fish

2-3 pounds fresh Gloucester Cod loin (the thick part from the head end of the fish–save the smaller tail pieces for chowder or to fry up with a little seasoned flour and cornmeal crumb–they freeze well!), cut in to 6-8 oz portions

salt and pepper to taste

In a medium bowl, combine crumbs, lemon zest and juice, parsley and olive oil, just enough to make the crumbs stick together.  Season with salt and pepper to taste.

Brush cod with a generous coating of olive oil and season well with salt and freshly ground pepper to taste and set aside

Preheat outdoor grill to medium or indoor grill pan to medium high.  If you are inside, turn on your broiler to low and move the oven rack to the middle position.  Place your cast iron or other grill pan on the burner to heat.  If using cast iron and you are unsure if the pan is seasoned enough, rub it with a paper towel soaked with olive oil just to ensure the fish doesn’t stick.  if you are outside, it wouldn’t hurt to brush the grates of your outdoor grill with a little oil as well,  just to be sure.

Cook fish in preheated pan about 4-5 minutes until browned on one side.  The thing with fish is when it is ready to flip it will tell you so by loosening its grip on the pan or the grill grate.  Just don’t mess with it.  Let the heat of the pan/grill do what it needs to do.  When you are ready to flip, grab tongs and a fish turner/ metal spatula and flip the fish.

Remove the pan from the stove (if indoors).  With your hand press as many crumbs as you like on to the fish to coat the top.  If you are outdoors, close the cover of the grill and give the fish a few more minutes too cook through (about 3-4) and for the crumbs to crisp.  If indoors, place the entire pan in the oven under the broiler for 3-5 minutes until crumbs are browned and fish is cooked through–do not leave the stove–the crumbs can go from gorgeous to burned very quickly.

And that’s it for the fish.

But wait, there’s more……….the fish is so simple I wanted to serve two easy sides to go with it.  For the asparagus, simply trim the spears of the woody end, toss with olive oil, season with salt and pepper and bake or grill for 8-10 minutes, depending on the thickness of the asparagus, shaking the pan once to flip them around.  That’s it!

Now, for the delicious tomato salad.  Grab some tomatoes from your back yard or the Farmer’s Market and cut them in half if they are small or in bite sized pieces if larger, about two cups.   In a small bowl, combine a few tablespoons of olive oil, a few tablespoons of balsamic or flavored vinegar, whatever fresh herbs you have on hand (I had a little oregano, basil and parsley) and chop them up to make one to two tablespoons chopped.  Add in some crumbled blue or goat cheese (or whatever you have on hand) stir, season with salt and pepper, and voila!  You have the perfect summer meal!

As always, feel free to leave ma a comment with questions and let me know how this comes out if you make it.  Thanks and enjoy.

Guess Who’s Going to the cook off in Chicago?

Me!  Thank you all so much for your votes and encouragement.  I am so grateful for your support and I am going to start practicing this week to make sure I get it executed perfectly in 45 minutes.

The cook off will be Saturday, September 25th on the main stage of Chicago Gourmet 2010, a food and wine festival a Millennium Park downtown http://www.illinoisrestaurants.org/associations/2039/chicagogourmet/ and it is a good thing I can cook in front of a crowd because this is a big deal.  I had no idea when I got involved in this that we would be cooking during the festival but I am excited to do so.

Thank you all again so much for your votes–the support of the GMG community is the BEST!  And in case you want to try what I hope is going to be the winning recipe, here it is:

Creamy Seaside Shells with Pan Seared Scallops and Seasonal Vegetables

Paired with Pinot Grigio

Description:

Santa Margarita Pinot Grigio pairs beautifully with seafood, particularly when prepared with a delicate sauce, fresh garden vegetables, herbs and zesty citrus. Delicious served warm or cold.

Ingredients:

  1. 1 to 1 1/2 pounds asparagus, trimmed & broken into bite sized pieces
  2. 1 small yellow (summer) squash, cut in 1/2 lengthwise & thinly sliced
  3. 6 tablespoons olive oil, divided
  4. 1 pound medium shell pasta
  5. 3 tablespoons butter
  6. 1 1/2 cups leeks, thinly sliced
  7. 3 cloves garlic, minced
  8. 1 1/2 pounds large sea scallops, patted dry & sprinkled lightly with salt & pepper to taste
  1. 1 cup Santa Margarita Pinot Grigio
  2. 3/4 cup chicken broth
  3. 8 oz goat cheese, broken in to small chunks
  4. 1 pint grape tomatoes, halved
  5. 3 tablespoons chopped fresh dill
  6. Zest of one lemon
  7. Salt & pepper to taste

Directions:

Preheat oven to 350F. Spray a sheet pan with cooking spray and place asparagus and squash in a single layer in the pan. Drizzle with 2 TBSP oil, season with salt & pepper and bake for 7 minutes. Cook shells in salted water until al dente. Drain, pour into a large bowl, toss with 1 TBSP oil, season with salt and pepper and cover to keep warm. Meanwhile melt 3 TBSP oil with butter in a large skillet over medium heat. Add leeks and garlic and cook over medium heat, 5-10 minutes or until cooked. Remove from pan with a slotted spoon. Increase heat to high and sear scallops on both sides, about 2-3 minutes per side. Remove from pan, cover and set aside. Add Pinot Grigio and broth, scraping browned bits off the bottom of the pan. Bring to a boil and reduce by half. Return leeks and garlic to pan and whisk to combine. Slowly add goat cheese, and whisk until a creamy sauce forms. Stir in all vegetables and combine with pasta. Stir in dill and zest. Serve topped with 3-4 scallops per bowl.

Making Essex Clam Chowder at the Emerson Inn with Gail “The Chowder Lady” Mathews McDonald

And this is why I love having my little TV show.  I get to visit gorgeous sites around the North Shore, eat fabulous food and talk about it and then cook with special people like Gail “The Chowder Lady” Mathews McDonald last week and the fantastic Clark Dexter again tomorrow!

Anyway, getting off track here.   I recently visited the gorgeous and historic Emerson Inn in Rockport http://www.emersoninnbythesea.com/about.htm and was given the grand tour but the Inn’s General Manager Stephan Amesoeder.  What a place…..lots of history, gorgeous view, stunning ocean side pool and so much more…………….but you know what my favorite part was?  The Clam Chowder of course!

Now, I need to be up front here.  I am clam chowder snob.  I am not giant fan of really thick chowder, I don’t like really thin chowder and if truth be told, what I really like when I make chowder is whole leftover steamers not chopped clams….but that’s for another post and another Inspired Cooking episode called “Laurie Makes Chowder Like Her Grandmother Helen Lufkin Made it a Million Years Ago.”

But Gail had me at hello.  When she produced a gigantic hunk of salt pork and told me that her chowder was not thick not thin but “velvety” I couldn’t wait to try it.  And believe me, friends, she knows how to make a bowl of chowder.  Gail has been featured in numerous cooking and travel magazines and it was featured on Food Network’s own Bobby Flay that dubbed her “The Chowder Lady” —and he is correct.  Here is a step by step recipe and how to for Gail’s Essex Clam Chowder.  Be warned–this recipe a couple of gallons of chowder and can be scaled down to suit your needs.

Essex Clam Chowder

Gail Mathews McDonald (The Chowder Lady)

Ingredients:
I Large package of Salt Pork  (scored)
2 Lg. Vidalia Onions (chopped)
I Gallon fresh shucked Essex Clams
1 gallon clam juice
3 pds of red potatoes (diced)
1 ½ quarts heavy cream
1 pound butter
Wondra Flour
Kosher Salt
Fresh Ground Pepper

Start by scoring your salt pork, so when you sautéed it with the onions the juice will render out. Place the salt pork & onions in a large pot on med heat, sauté the salt pork for approx 3-4 minutes.

Adding 1 cup of clam juice so it doesn’t stick to the pan. Continue to cook a few minutes till the onions are translucent.
Then add 3 pds of diced potatoes to pan covering with the remaining clam juice, bring to a low boil, cooking them till they are tender but not mushy adding fresh ground pepper.


When they are done add the clams, butter a pinch of salt and fresh ground pepper. Shut off the pot and stir the ingredients together, then cover and let set for about 10 minutes, this will allow the butter to melt and the clams to cook slowly so they do not get to tough.

Then to finish the chowder add the cream and turn the chowder back on, bring it back up to a simmer. Then wisk in the Wondra flour slowly to thicken to your liking. Remember the chowder will continue to thicken as you cook it.

Finish with fresh ground pepper. Serve with cracker or bread croutons.

ENJOY!!!  (and yes, Gail made little bread croutons that she cut out with a fish shaped cookie cutter…..gorgeous…and then garnished with a little fresh chives)

Time to brag about a friend and share an amazing recipe with you!

This gorgeous cake is the creation of my friend Jannine Fisk.  I may have blogged about her before in reference to the Topsfield Fair perhaps as that woman has enough ribbons to wall paper her entire house if she felt like it.  She really is an amazing baker and cook and that was just confirmed yet again yesterday when she found out that she won a lovely cash prize coming in first place from Better Recipes.com in their Dazzling Birthday Cakes & Cupcakes Challenge.

Towering Fudge Fantasy Cake by Jannine Fisk

Ingredients

  • Cake Layers:
  • 3 cups sugar
  • 3 1/2 cups all purpose flour
  • 1 1/2 cups Dutch process cocoa
  • 4 tsp baking soda
  • 2 tsp baking powder
  • 2 tsp salt
  • 1 cup honey
  • 4 large eggs
  • 2 cups buttermilk
  • 2 cups strong brewed coffee, cooled
  • 1 cup vegetable oil
  • 2 tsp vanilla
  • Chocolate Ganache Filling:
  • 1 cup heavy cream
  • 8 oz semisweet chocolate
  • 1 tsp instant coffee granules
  • Chocolate Buttercream Icing:
  • 1 cup butter
  • 8 tbsp half and half
  • 2 tsp vanilla
  • 1 1/2 cups Dutch process cocoa
  • 2 lbs confectioners sugar
  • Garnish:
  • 1 1/2 pounds fresh strawberries, divided
  • 1 cup semisweet chocolate morsels
  • Chocolate buttercream icing
  • 30 chocolate wafer cookies, finely crushed
  • 2 oz milk chocolate for shavings and curls
Method

Preheat oven to 350 degrees. Grease and flour four 9 inch round baking pans. Line with parchment and set aside. In a large bowl, stir together all dry ingredients. Add remaining ingredients and beat on medium speed for 3 minutes. Pour half of batter into another bowl and divide remaining batter evenly into four prepared pans. Bake 18-22 minutes or until a tester comes out clean. Cool 5 minutes, then turn out onto racks, removing parchment. Wash and dry pans and repeat process with remaining batter. When finished, you will have eight thin layers. Meanwhile prepare ganache. In a saucepan over medium heat. Warm heavy cream until just boiling. Place semi-sweet chocolate in a large bowl, add instant coffee and pour boiling cream over top. Let sit for 1 minute, then whisk until melted, smooth and silky. Refrigerate 1 hour or until thickened, stirring every 15 minutes. Wash and dry strawberries thoroughly. Set aside 12 whole berries. Remove tops from remaining berries, slice thinly, and set aside. Melt 1 cup semi-sweet chocolate in microwave, then dip whole strawberries 3/4 way into melted chocolate. Let cool on waxed paper in refrigerator. Icing: Mix butter, half and half and vanilla well in a large bowl, then gradually add cocoa and confectioners sugar. Beat until smooth and fluffy. Assemble: Place one cake layer on a platter. Spread with about 1/4 cup ganache and top with next layer. Continue alternating ganache and cake layers, pressing a thin layer of sliced strawberries between every other layer. End with a layer of cake on top. Frost cake, reserving some for decoration. Press crushed chocolate wafers onto sides of cake. Pipe 12 rosettes on top edge of cake, then place chocolate covered strawberries in between. Sprinkle center with chocolate shavings and curls. Decorate bottom edge with remaining icing.

Notes: Baking the layers individually eliminates the difficult and tricky process of dividing the layers horizontally with a knife. This process ensures they are an even thickness so there is less of a chance of the cake leaning to one side.

Number of Servings: 12

First Day of the Farmer’s Market–from the kid’s point of view

Just a few pics from today’s opening of the Farmers’ Market at its newly gorgeous location—GMG was well represented and the ladies and gentlemen who take the great pics were out in force but I got a few of my kids and the ceremony to share with you………Great Job to all involved—it is a great day for Cape Ann and the City of Gloucester!

Brianna and Lily are their way to the market!

The ceremony from Roger’s Street

Mayor Kirk and some City Council members at the ribbon cutting ceremony–and the kids had taken off on me by this point…..

My niece Sarah–she would shortly be chewing on a delicious piece of pizza crust from Alchemy that I shared with her…….yum!

Sarah and Sophie

Can I touch her?

Got her!

Brianna’s cool tattoos

Best friends Lily and Brianna!

And we got out of there and home right before the first raindrop hit!

Essex River Day–me and Lil call it “down river day”–was a BLAST!

Essex Marina was packed!  If I had not spent my day getting ready for the bake sale, I would have been “down river” too!  A glorious day—Essex River Day is a recent addition to the Essex Summer “must do” list.  The celebration is a day in which people who own boats in Essex take people who don’t have boats out on the river for a ride, to the beach or fishing for the day so they can enjoy being on the water too!  The day winds up with a pick up softball game for kids and adults and a festival at Memorial park complete with music, food, face painting and a bonfire!

These ladies (Trina Haskell & Patty Davis) are stylin’ in their fancy aprons and serving burgers, dogs and sausages for the Essex Lions Club

The PTO bake sale was a BIG hit!  There was not a crumb left by 9:00.  Next year we need more goodies to sell~and look what my cousin Laurie created for the sale~

Burger & Fries, anyone?  Really, it’s a yummy golden cupcake for the burger and toasted golden cake for the fries~

The face painters thought they should first paint their own faces and then start painting the kids–these ladies did an amazing job to benefit the Essex PTO

A work in progress…….

Double Trouble!  These boys looked terrific!

Nora is transformed in to a gorgeous butterfly!

and Ali becomes a cat….

Happy spectators at the softball game

Plenty of food for everyone….and my Dad eating corn!

And in case you were wondering, the sign on the camper says

“Essex River Day World Headquarters”

And here is a good part of the crew responsible for making Essex River Day such a success!

And the grand finale……………the bonfire!

This event keeps growing bigger every year and a great time was had by all!